
In traditional architecture and design, tiles were reserved for wet areas like bathrooms and kitchens. However, with design trends changing every year, more and more property owners are now opting for tiles for their floors and walls beyond wet areas. Aside from the practical use, tiles can have a unique visual appeal compared to other floor and wall designs. This is because of the many tile options now available include materials like glass, ceramic, porcelain, and natural stone.
To this end, most of the construction, remodeling, and renovations you will be handling will include tiles. It is thus essential to get the right tool and skills to guarantee an exceptional tile job. Contractors focus on getting the best tile leveling system to put the best finishing touch on their tile laying.
The laying of the tiles is, however, also essential to ensure you get the best final look for your tiled walls and floors. One of the tools needed for this is a tile spacer. This is a small tool usually made of plastic used to ensure tiles are separated equally. Used correctly, your tiles can look uniform and clean.
It is used to create an equal distance between your tiles and thus generate a uniform tile layout for your intended pattern. While they aren’t a hard requirement for installing tiles, using tile spacers are much more efficient and practical than simply eyeing your tiles and estimating if the distance between each tile is equal.
However, there are plenty of types of tile spacers sold in your local hardware or construction supply store, and some of them may have different uses and purposes. The following are some types of tile spacers that might suffice for your construction.
X-Shaped Spacers
These spacers are the commonly used ones and resemble a cross as their name suggests. The spacers are used in the intersection points of four tiles, such as in the main body of your wall or floor installation. X-shaped spacers come in sizes of 1/16’’ to ½’’.
Tavy Tile Spacers
This is a variant of the x-shaped spacer. Rather than a simple cross-like shape, Tavy tile spacers have a ring around them. The ring prevents the spacer from falling out into the adhesive you will use to stick your tiles to the substrate.
It will also allow you to visualize the four corners of your tiles’ intersection. Tavy tile spacers come in sizes of 3/8’’ to 1/32’’.
T-Tile Spacers
 These are usually used at the point of intersection of three tiles. T-tile spacers are thus commonly used at the point where your field tile meets the trim, or when putting together a running bond tile pattern. The spacers are available in sizes of 3/8’’ to 1/32’’.
Wedge Spacers
These are small-sized spacers typically made of flexible plastic. They are generally used on wall tile installations and the adjustment of heights in uneven handmade tiles. Wedge spacers can be stacked on top of each other to generate a wide space between your tiles if need be.
Horseshoe Spacers
These are at times known as U-shaped spacers. They are often used in the installation of countertop tiles to even plywood tops before you install your backer boards. Horseshoe spacers come in sizes of1/8’’, 1/16’’ and ¼’’.
After ascertaining the dimensions of your tiles, you should gauge their spacing to minimize the need for resizing after you start your installation. This way, you can lay down the tiles without using too much filler or small pieces that would affect the edges and layout of your tiles.
You can thus not guarantee an optimal and inexpensive tile installation without the rights spacer from the above. The correct size for your tile spacer is also essential. Tiles measuring 8×8 inches, for instance, will generally need a 1/16’’ or 1/32’’ spacer while 12×12’’ tiles need a 1/8’’ or 1/16’’ spacer.
Applying Your Floor Tiles

While the process of applying tiles is pretty straightforward, but the time it takes to apply your tiles (and make sure they’re properly leveled and aligned) can take much longer. So, here’s how you should apply your tiles the proper way.
Clean the Existing Floor
Make sure your floor is clean of any glue, dirt, and mortar that can affect the leveling, bonding, and stability of your tiles. If the floor is a newly applied layer of cement, give your sub-floor at least 24 hours to fully dry and stabilize. Use a broom first, then mop with an all-purpose cleaner.
Establish Your Starting Point
If you start in the center of a room and your tiles aren’t customized for that job, it’s highly likely that you will need to cut some tiles to fit the edges of the floor.
But if your client or their interior designer has mentioned that they’ll be putting large furniture in certain parts of the room, you can start at one end of the room then make your way to that part of the room.
That way, the large furniture can cover up the cut tiles. Otherwise, start from the center of the room.
Organize Your Tiles & Create a Guide
If all your tiles are identical and have no specific placement, this shouldn’t be a problem. But if you’re using tiles that need to be placed at a certain position, alternating tiles, or making a specific pattern or design, organize the tiles accordingly so that you don’t have to go back and forth every time you install a new tile.
Now is also a good time to measure the room and find the center. Mark this with chalk or any other method that works for you. This will be helpful later when applying tiles in the center of the room to the walls.
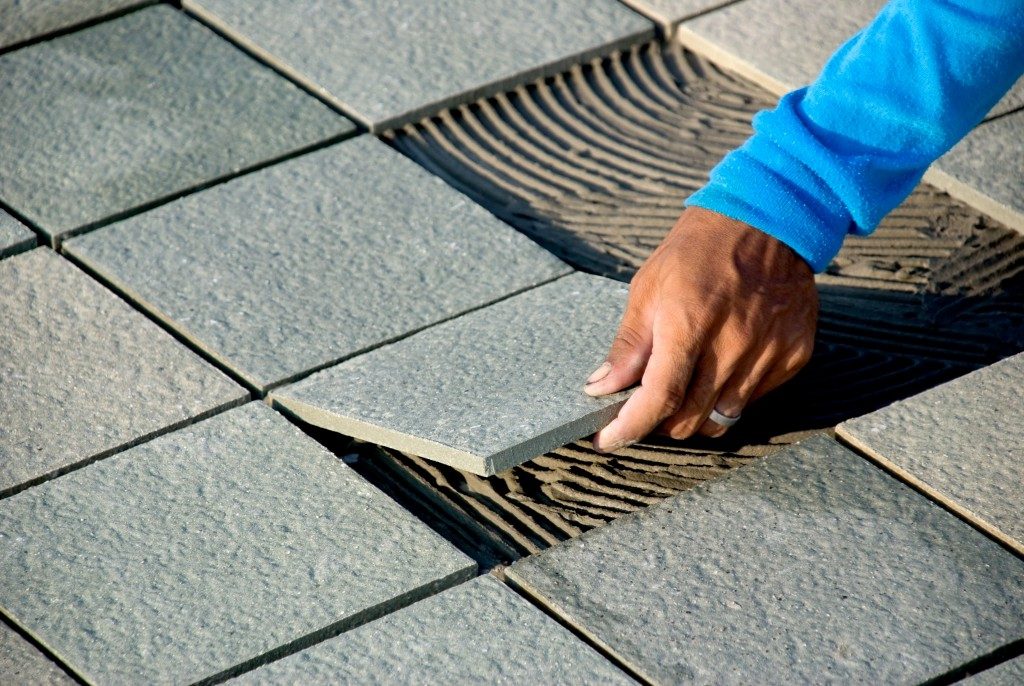
Apply Your Mortar or Tile Cement
Ideally, you should be using tile cement for linoleum or vinyl tiles, while mortar (thinset) for ceramic or porcelain. Using the flat side of the trowel, put enough mortar or cement on the floor and then comb even horizontal lines. Your tiles will grip onto the floor more effectively with neat horizontal lines than with random curved lines or not adding lines at all.
When applying mortar, only put enough to last you 10 minutes of tile application. If you put more, the mortar may begin to harden too quickly and will either need to be scraped and re-applied. If you’re using tile cement, apply it and give it 10 to 15 minutes to become sticky before applying.
Press the tile firmly into the tile cement or mortar. Use a rubber mallet or a claw hammer to press down on the tile to make it stick to the floor better. Insert your tile spacer on one corner of the tile and use that to measure an equal distance between the tiles. Wipe away any cement that spills in between the tiles.
Some tile spacers have to be taken out after applying all four tiles, while others can be removed after the tiles have been left to dry overnight.
Tips for Installing Tiles
- As much as possible, keep the room empty while installing tiles for maximum efficiency.
- After installing your tiles, keep the room well-ventilated to help it dry faster. Preferably, leave the doors and windows open for better air circulation.
- Bring enough tile spacers so that you don’t have to remove and reuse your spacers before your tiles finish drying. Your tile spacers can be cleaned are reused for your next project.
- For installing tiles on counters and walls, the same steps apply, but make sure the tiles are firmly set in place before releasing.
- If possible, let your tiles dry for at least 24 hours.
- After your tiles dry, apply a layer of grout to spread into the gaps of your tiles.
Providing the best quality services means having the tools necessary to perform well.
While tile spacers aren’t a hard requirement for tiling projects, it’s a small but highly recommended tool to have to avoid construction mishaps and misaligning your tiles. This can result in a warped tile design or a poor-quality job that your clients won’t appreciate.